Tuesday, June 2, 2015

How to create cute Teddy bear fondant topper


I thought I'd start my tutorial with something pretty simple. Like this cute teddy bear fondant topper. I use them a lot especially in baby cakes and as cupcake toppers. They're very cute and are pretty easy to make!


 The things that you will be needing:

Paint brush, ball tool (or the back of your paintbrush if ball tool is not available), the stick with the pointy end (not sure what it's called) or toothpicks, uncooked spaghetti, light brown fondant, lighter shade of brown fondant, pink fondant. Also some water and black food color (I forgot to include it on the picture!).
Roll the light brown fondant into a ball (head), slightly bigger tear-shaped ball (body), 2 long tear-shape (arms), 2 slightly bigger tear-shape (legs), 3 small balls (ears and tail).


Make an indentation for the two small balls using the ball tool (this will be the ear of the bear). if you do not have a ball tool, you can use your pinkie finger or the back of your paint brush instead.

Flatten a small ball using the lighter shade of fondant for the nose of the bear.

 Attach the nose into the head using water.

 Also attach the ear to the head.

And the arms and legs on the body and don't forget the tail at the back.

Create some stitches using this tool. I bought them as a set but if you do not have them, you can use that back of a toothpick instead. The stitches should be all the way from the front to the back of the head. 

Make two small balls for the eyes using the brown fondant and one ball for the nose with the pink fondant.


Attach them to the head. Take your spaghetti straw and place it at the center of the body. this will attach the head of the bear to it's body. Let it dry a bit for about an hour (you would not want to squash the body of the bear with it's head!).

Dip your paintbrush in black food color and color the eyes. You can also use black fondant for the eyes but I find this easier if I don't have black fondant lying around.

You can recreate your bears in any size and color you want!:)

Monday, June 1, 2015

The Dragon Cake


Before I start my proper blogging and tutorial thingies (We are still preparing all the proper gears, cameras and whatnots for those!) I thought I'd share a story of how I made this huge red and gold dragon cake for the Chang Kai Shek Alumni Association's 50th anniversary celebration.

Last June 2014, my Aunt commissioned me a cake for the 50th anniversary of their Alumni Association (she is a very important member of the association). The cake has to be extravagant because it will be seen by more or less 500 guest for the event. The theme has to be red with a touch of gold and something Chinese because it is a Chinese school after all. I did a couple of sketches for them and showed a few pictures such as cake with swimming Koi, Chinese boat, Chinese pagoda buildings but nothing was up to their taste until they settled for this. Five layer cake with a Chinese dragon circled around the tiers.


I have never done anything this big and very detailed, but I never back down from a challenge. The easy part was covering the tiers with red fondant (I use marshmallow fondant, homemade). Yep! Even covering the big tiers (biggest is at 16") was easy compared to the dragon. The whole dragon was made out of fondant, rolled into huge logs and attached with many many many bamboo skewers. I cut red fondant circles for the scales and painfully attached them each to the dragon (Must have been hundreds if not thousands of scale in this dragon!).


 Then came the flower details using royal icing brush technique (thanks Youtube University!) and chinese gold coins. The head was made out of rice crispies covered in fondant. Then I had to paint them with gold food color mixed with vodka, I can not remember how many bottles of food paint I consumed for this project!

Oh! and I forgot to mention this cake includes 80 individually boxed cupcakes under the same theme! hahaha! I thought I'd die the night before!


 I had to deliver them in pieces, otherwise they won't fit. We traveled in two cars (I borrowed my Uncle's Toyota Revo because I did not have my own until earlier this year). I had all my tools for last minute retouch and even brought my own ladder (as I could not reach the top!).


Forgive my lack of make-up and baggy eye-bags in this photo due to my lack of sleep! I arranged some of the tiers and attached the dragon head on site. The cake part as well as the cupcake was red velvet with cream cheese buttercream frosting.

The final result was a 45" tall cake, only 3" short to 4 ft! It was painful and grueling work, but the reaction that I got from the people who saw the cake was priceless! I was so ecstatic when people started taking their selfies with the cake. It made every hour spent on this project worth-it!


-Cupcake

The event was held in Century Park Hotel, Manila last October 5, 2014.

About me!

Hi! I am Vanessa Jane. People call me Vani, Cupcake, Queen or Cupcake Queen...whatever you wanna call me. I'm a newbie blogger, not so newbie baker, cake decorator and painter and I have a Master's degree in...( not that it really matters! haha). I used to have a corporate job, with a desk, a computer, phones and printers and a lot of free goodies from clients every December when on the last day of 2012 I quit! So I was jobless on the first day of 2013 and quickly decided that I wanted to bake! luckily though, I got my first order from my cousin 5 days later (I've always been baking for family and friends then). It was a cake shaped like a cockroach! Then I went on and made myself a Facebook page and an Instagram account (which I am hoping to get more followers by blogging! Hahaha).


I’ve been making cakes from then on in our small kitchen from our very small apartment!
I am not a newbie baker. I’ve started baking when I was 11 or 12 when my mom bought tools and ingredients in her attempt to bake that apparently never happened! So I pretty much took over the baking department as well as the whole kitchen from that day on (yup, my mother rarely cooks too!).

My first fondant cake was way back when I was 17 years old (11 years ago). It was my gift from my friend’s 18th birthday. The cake was very far from what I do now, but judging by the work of a teenager, I thought it was a fairly decent job! (I did a similar themed cake last year and well, you can see how much I’ve improved!)


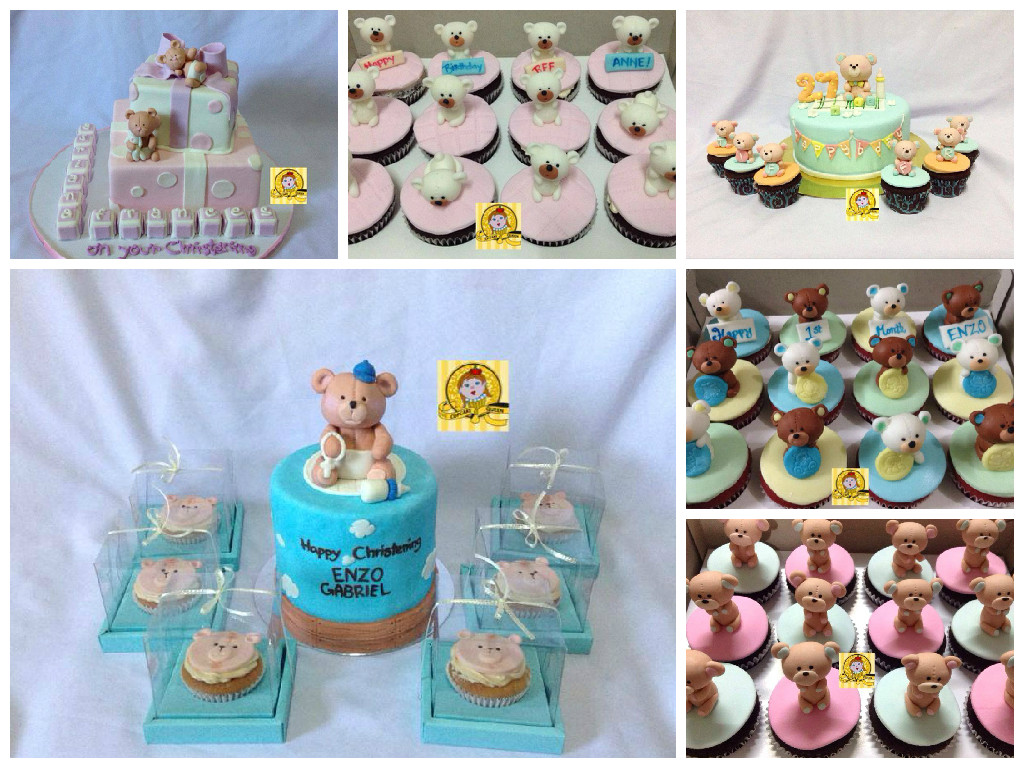
I've never had any formal training (I did however took an all buttercream class 2 weeks ago form the Queen of Hearts Cake Couture when they visited the country but that's it!). My love affair with cake decorating started when I was 16 yrs old when I stumble upon an old unwanted book on a book sale for Php 200, it was a cake decorating book from Sylvia Weinstock (The mother of Sugar flowers!). I just bought the book for no reason at all and got hooked from then on and bought more books after that. So I pretty much learned from books and recently form Google and Youtube University! Here are some of my favorite works that I've done from my past 2 years of home baking.


Please check out more of my works on www.facebook.com/thecupcakequeenph or instagram @iamthecupcakequeen.

My first attempt in opening a storefront last year was a complete failure and I haven’t attempted to try again. But otherwise, I think I’ve been really blessed with so may good clients so I think it's time to give back and share a few of my knowledge on baking and whatnots! I will try, as much as I can (on my free time) to give tutorials on simple cake decorating to baking and where to buy stuffs here in the Philippines! And to share stories on my cake creations as well.

-Cupcake